> ## Documentation Index
> Fetch the complete documentation index at: https://docs.dexdata.ai/llms.txt
> Use this file to discover all available pages before exploring further.
# Connect your data source to Dex
> Connect your data source and find the credentials you need.
This page is a step-by-step connection guide covering all supported connection types: databases, file uploads, and integrations.
## Before you begin, you need
* Owner role in the workspace
* Access to the source system you want to connect
If your source is behind a firewall or private network, add this Dex outbound IP address to your allowlist before testing the connection: **44.216.91.118**.
**Overview**
* Dex supports three connection categories: Databases, File uploads, and Integrations.
* Databases typically connect over TCP/SSL (host, port, user, password). Files are uploaded directly. Integrations use REST APIs or OAuth.
**How connections work**
1. Provide credentials in the connection form. Dex runs a live test to validate connectivity.
2. Dex performs a schema sync to discover tables/collections and generate AI descriptions.
3. After sync, query your data using natural language; Dex translates to SQL or API calls.
## Databases
Below are the supported databases and the exact step-by-step setup for each.
### PostgreSQL
Required fields: Host, Port (default 5432), User, Password, Database.
Step-by-step:
1. Connections → Add Connection → select `PostgreSQL`.
2. Enter Host and Port (5432 unless changed).
3. Enter User and Password.
4. Enter Database name.
5. Click `Test Connection` (Dex runs `SELECT 1`).
6. Click `Connect` to begin schema sync.
Notes: Ensure inbound access from Dex's IP or whitelist. Enable SSL if required.
### Supabase (managed Postgres)
Supabase is a hosted Postgres database. Connection parameters match PostgreSQL, and you can provide either a full connection string or individual fields.
Required fields: Host, Port (default 5432), User, Password, Database — or a connection string.
Step-by-step:
1. In Supabase, gather your connection details.
a. Sign in to Supabase and select the project you want to connect.
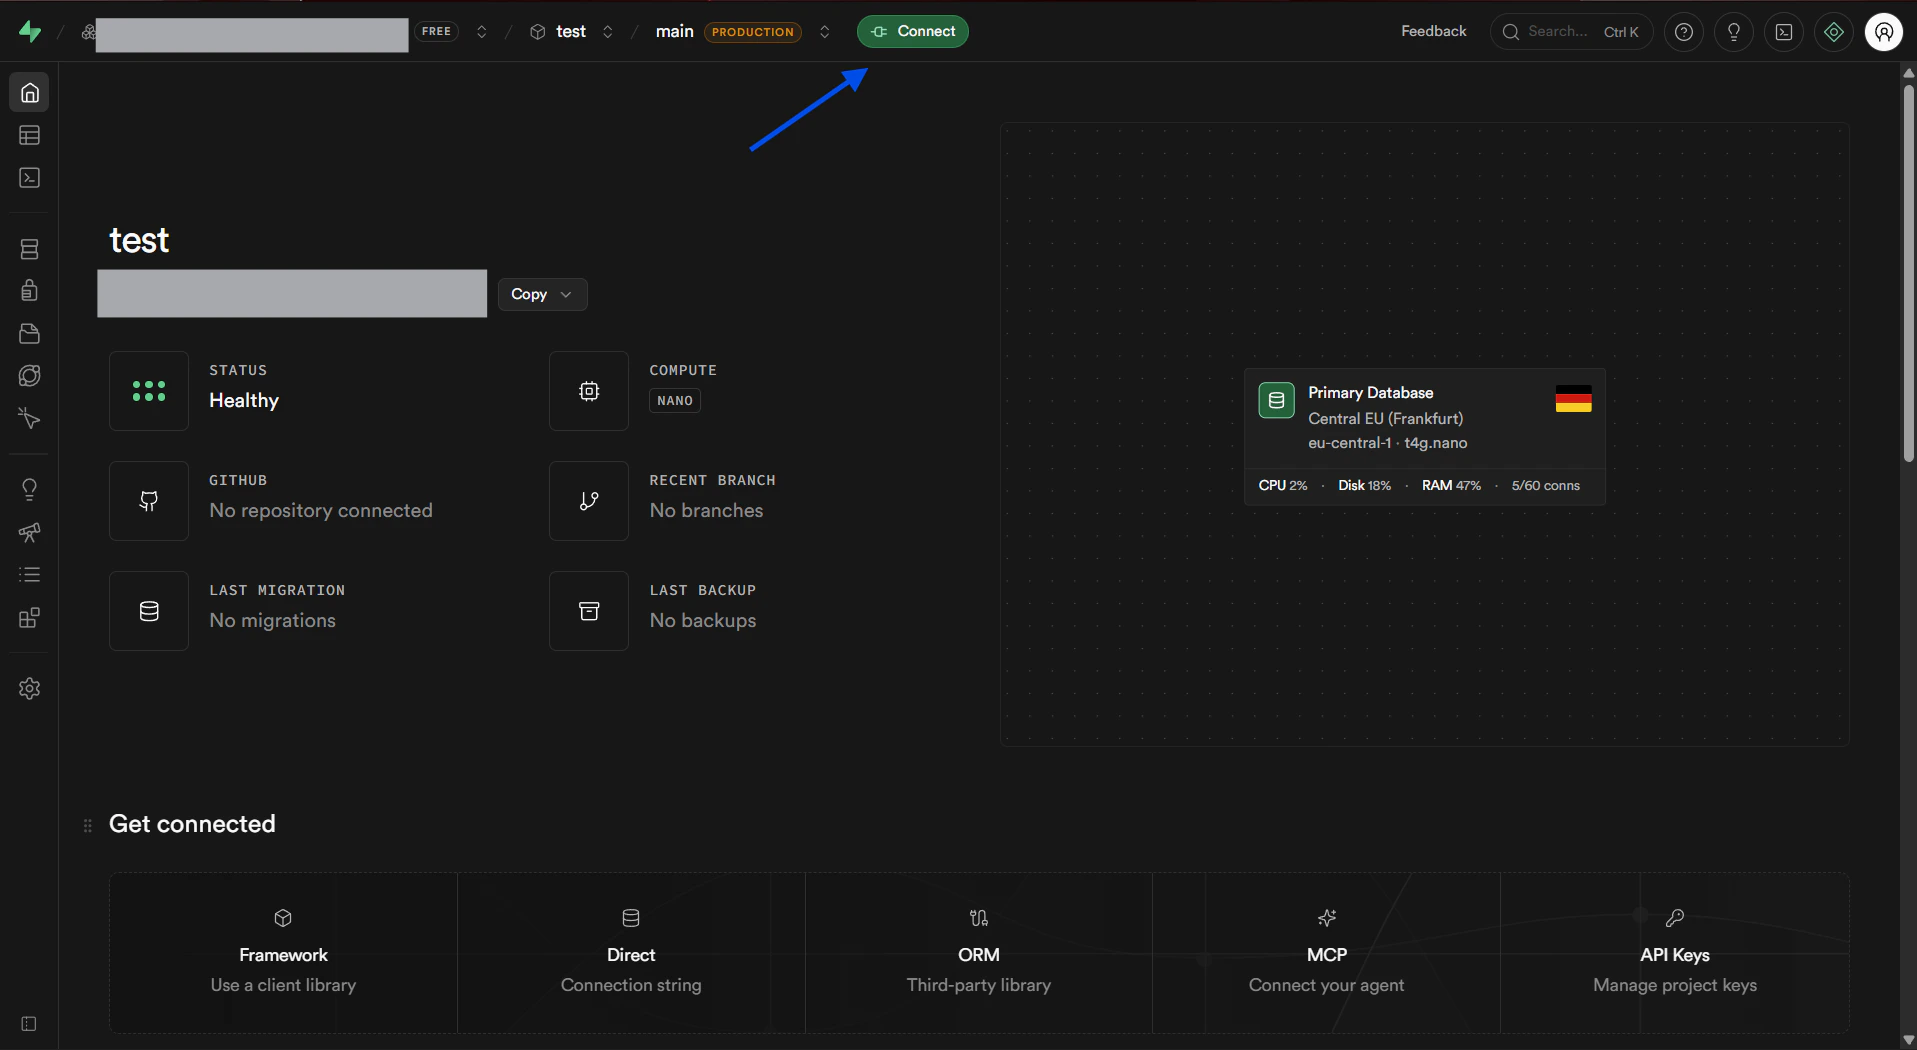
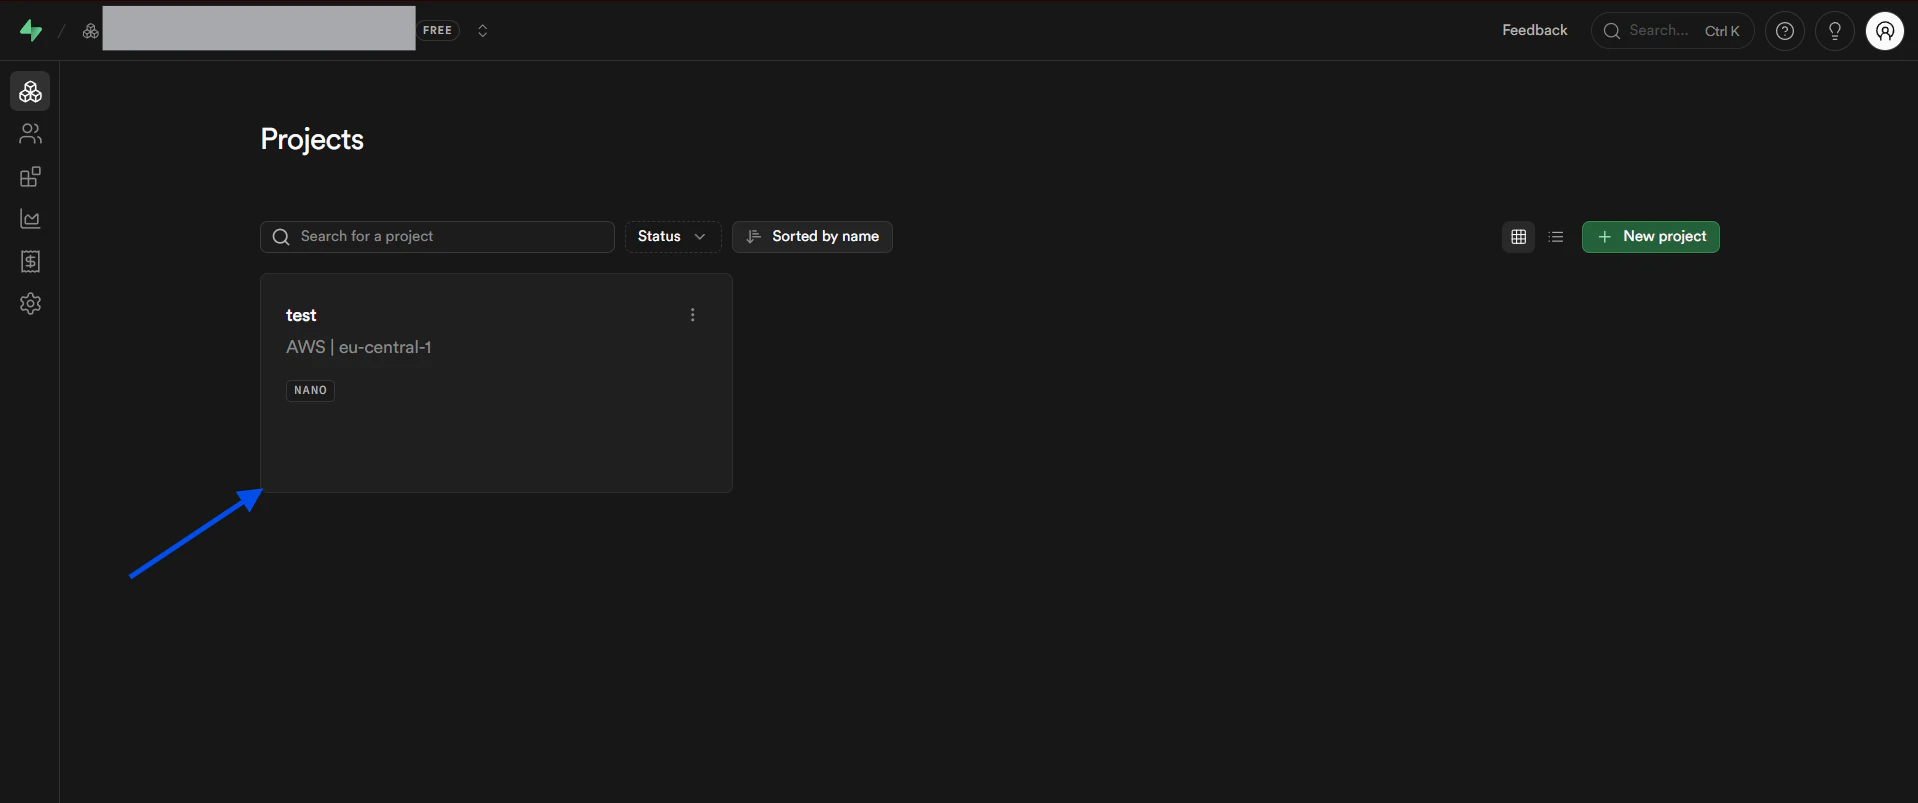 b. In the project dashboard, on the top bar, click **Connect**.
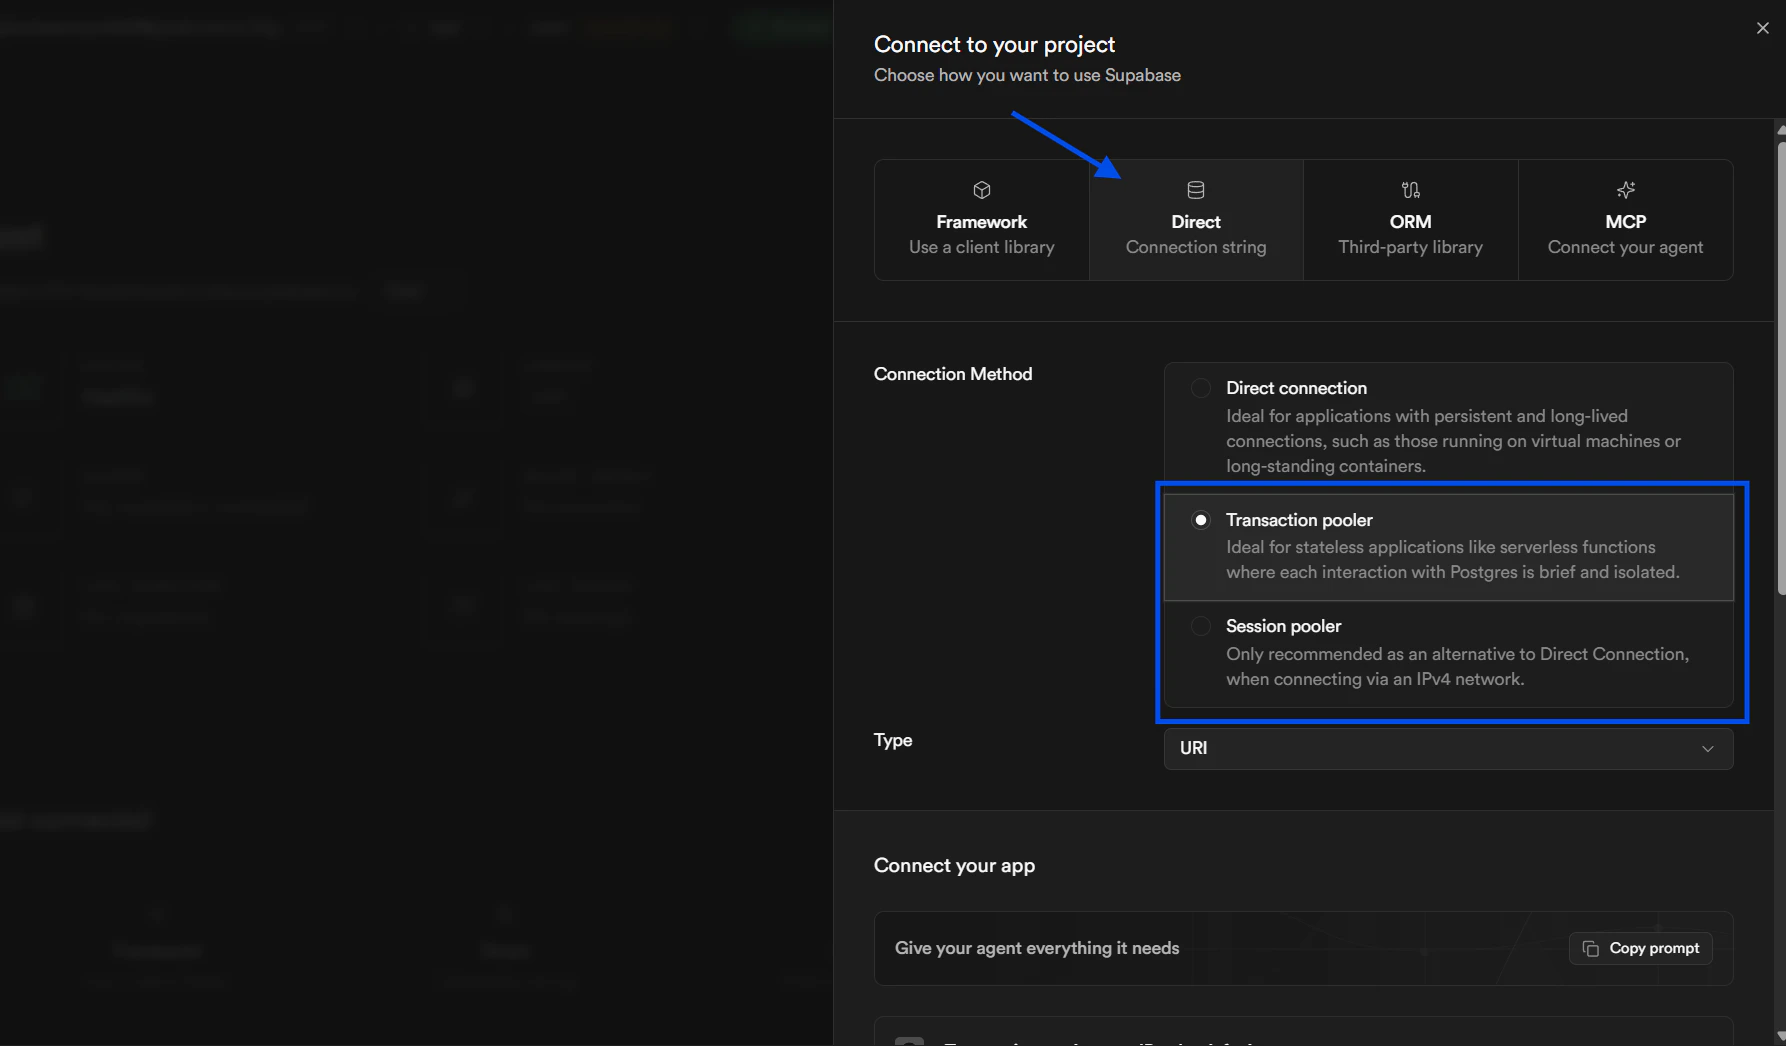
 c. Select **Direct** → **Transaction pooler** or **Session pooler**, then copy the connection string or host parameter.
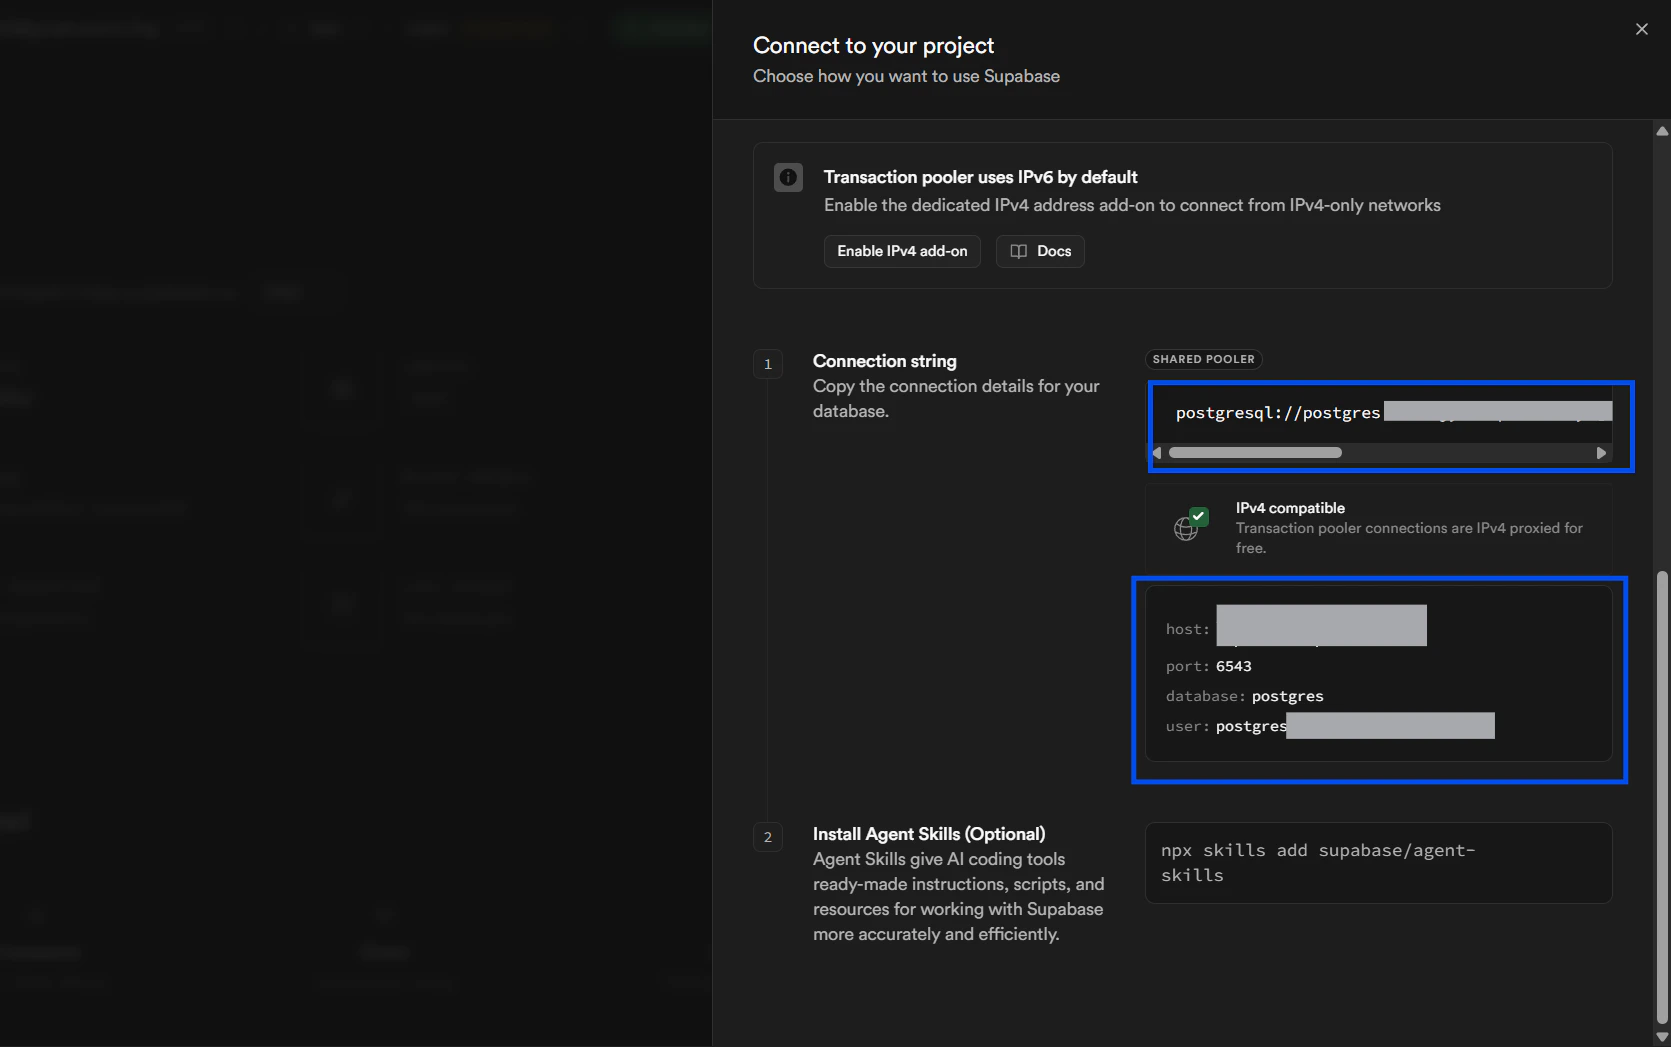 d. You need the project password. If you do not have it, contact your organization admin.
2. Connections → Add Connection → select `PostgreSQL`.
3. Either paste the full connection string in the connection form, or enter Host, Port (5432), Database, Username, and Password.
4. Click `Test Connection` (Dex runs `SELECT 1`).
5. Click `Connect` to begin schema sync.
Example connection string format (replace placeholders):
```
postgresql://postgres:password@host:5432/database
```
### MySQL
Required fields: Host, Port (default 3306), User, Password, Database.
Step-by-step:
1. Connections → Add Connection → select `MySQL`.
2. Enter Host, Port, User, Password, and Database.
3. Click `Test Connection` then `Connect`.
Notes: For MySQL 8+, ensure authentication plugin compatibility (e.g., `mysql_native_password`).
### Snowflake
Authentication: Password or Key-Pair.
Required (password): User, Password, Account, Database, Warehouse, (optional Role).
Required (key-pair): User, Account, Private Key (PEM), Private Key Passphrase (optional), Database, Warehouse, Authenticator=SNOWFLAKE\_JWT.
Step-by-step:
1. Connections → Add Connection → select `Snowflake`.
2. Choose auth method (Password or Key-Pair).
3. Enter Account, User, and credentials.
4. Enter Database and Warehouse, set Role if needed.
5. Click `Test Connection` (Dex runs `SELECT CURRENT_TIMESTAMP()`), then `Connect`.
Notes: Paste full PEM (including BEGIN/END) for key-pair auth.
### MongoDB
Required fields: Username, Password, Cluster URL (without protocol), Database, Options (optional).
Step-by-step:
1. Connections → Add Connection → select `MongoDB`.
2. Get Cluster URL from Atlas (omit `mongodb+srv://`).
3. Enter Username, Password, Database, and Options as needed.
4. Click `Test Connection` then `Connect`.
Notes: Add Dex's IP to Atlas Network Access whitelist. Dex samples documents to infer schema.
### Google BigQuery
Required fields: Project ID, Dataset ID, Service Account JSON key.
Step-by-step:
1. Create a Service Account in GCP.
a. Go to GCP Console ([cloud.google.com](https://cloud.google.com)) and sign in to your account.
b. Search for "IAM and Admin" in the search bar and select it.
d. You need the project password. If you do not have it, contact your organization admin.
2. Connections → Add Connection → select `PostgreSQL`.
3. Either paste the full connection string in the connection form, or enter Host, Port (5432), Database, Username, and Password.
4. Click `Test Connection` (Dex runs `SELECT 1`).
5. Click `Connect` to begin schema sync.
Example connection string format (replace placeholders):
```
postgresql://postgres:password@host:5432/database
```
### MySQL
Required fields: Host, Port (default 3306), User, Password, Database.
Step-by-step:
1. Connections → Add Connection → select `MySQL`.
2. Enter Host, Port, User, Password, and Database.
3. Click `Test Connection` then `Connect`.
Notes: For MySQL 8+, ensure authentication plugin compatibility (e.g., `mysql_native_password`).
### Snowflake
Authentication: Password or Key-Pair.
Required (password): User, Password, Account, Database, Warehouse, (optional Role).
Required (key-pair): User, Account, Private Key (PEM), Private Key Passphrase (optional), Database, Warehouse, Authenticator=SNOWFLAKE\_JWT.
Step-by-step:
1. Connections → Add Connection → select `Snowflake`.
2. Choose auth method (Password or Key-Pair).
3. Enter Account, User, and credentials.
4. Enter Database and Warehouse, set Role if needed.
5. Click `Test Connection` (Dex runs `SELECT CURRENT_TIMESTAMP()`), then `Connect`.
Notes: Paste full PEM (including BEGIN/END) for key-pair auth.
### MongoDB
Required fields: Username, Password, Cluster URL (without protocol), Database, Options (optional).
Step-by-step:
1. Connections → Add Connection → select `MongoDB`.
2. Get Cluster URL from Atlas (omit `mongodb+srv://`).
3. Enter Username, Password, Database, and Options as needed.
4. Click `Test Connection` then `Connect`.
Notes: Add Dex's IP to Atlas Network Access whitelist. Dex samples documents to infer schema.
### Google BigQuery
Required fields: Project ID, Dataset ID, Service Account JSON key.
Step-by-step:
1. Create a Service Account in GCP.
a. Go to GCP Console ([cloud.google.com](https://cloud.google.com)) and sign in to your account.
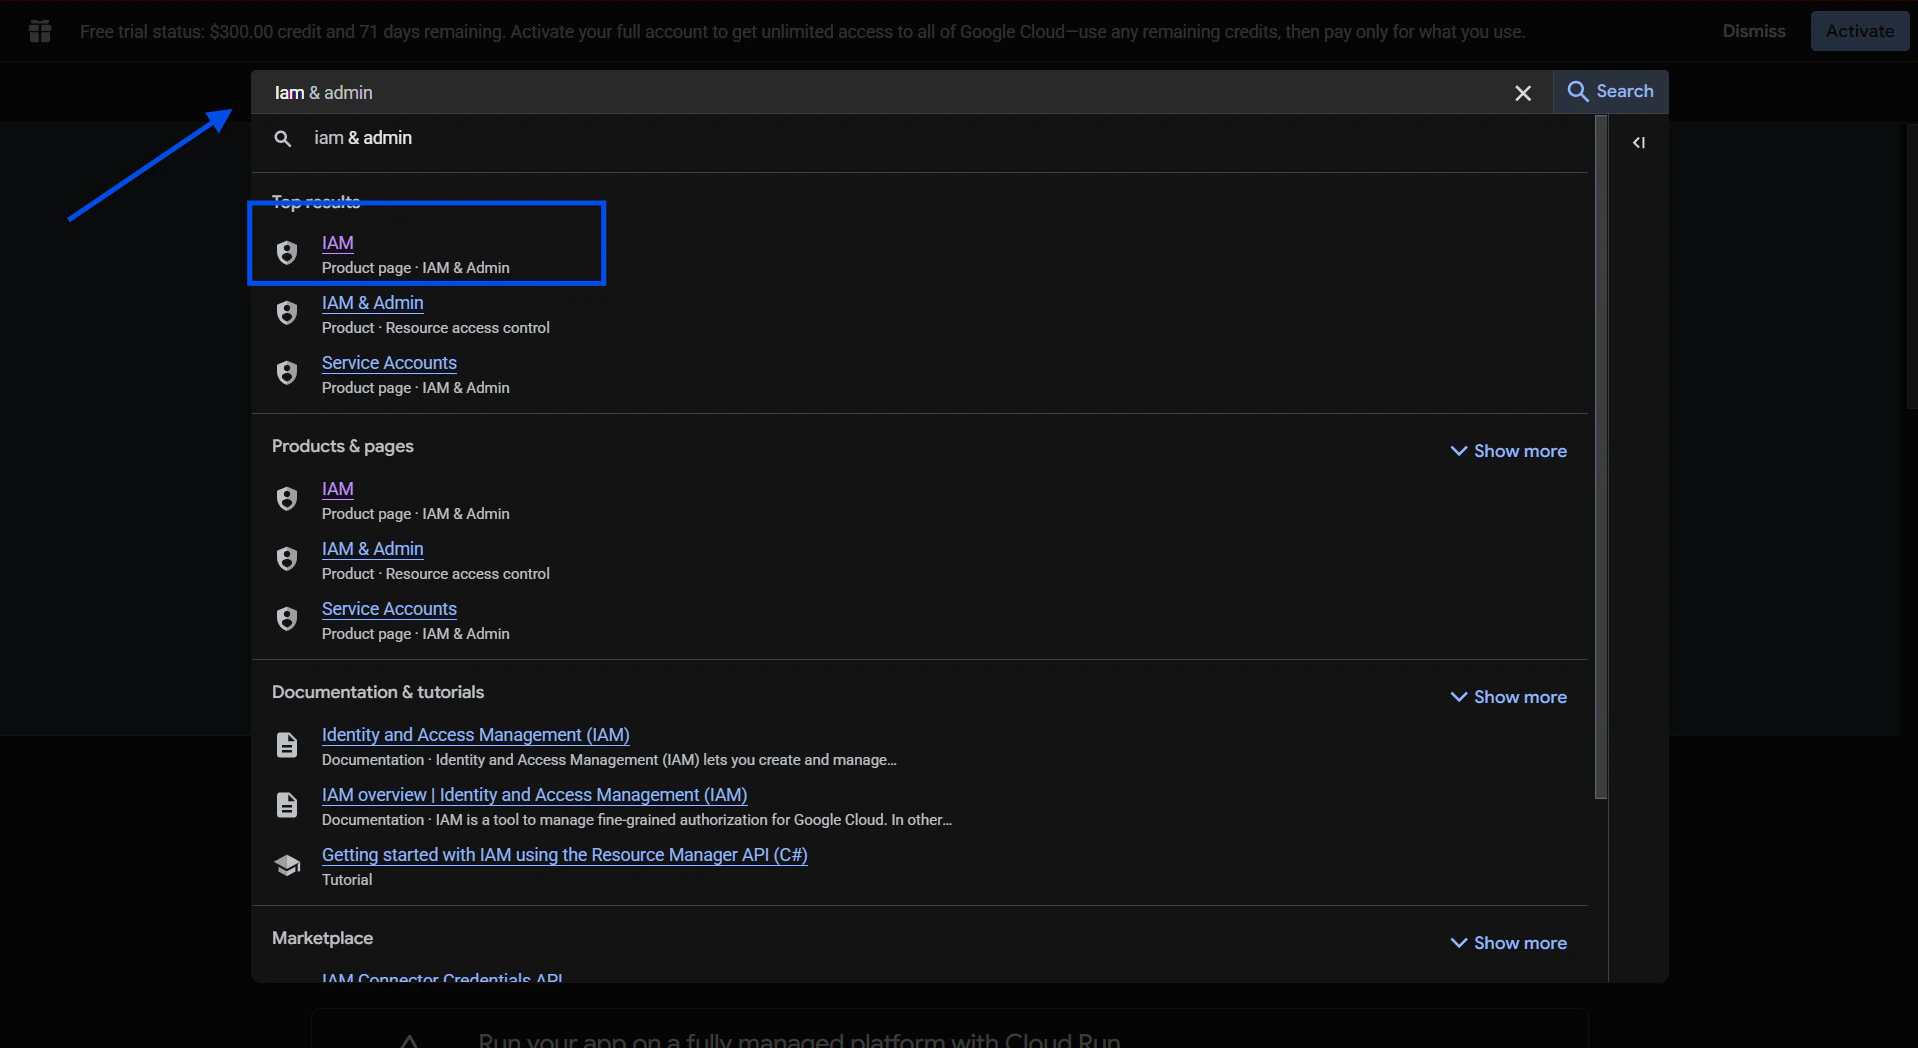
b. Search for "IAM and Admin" in the search bar and select it.
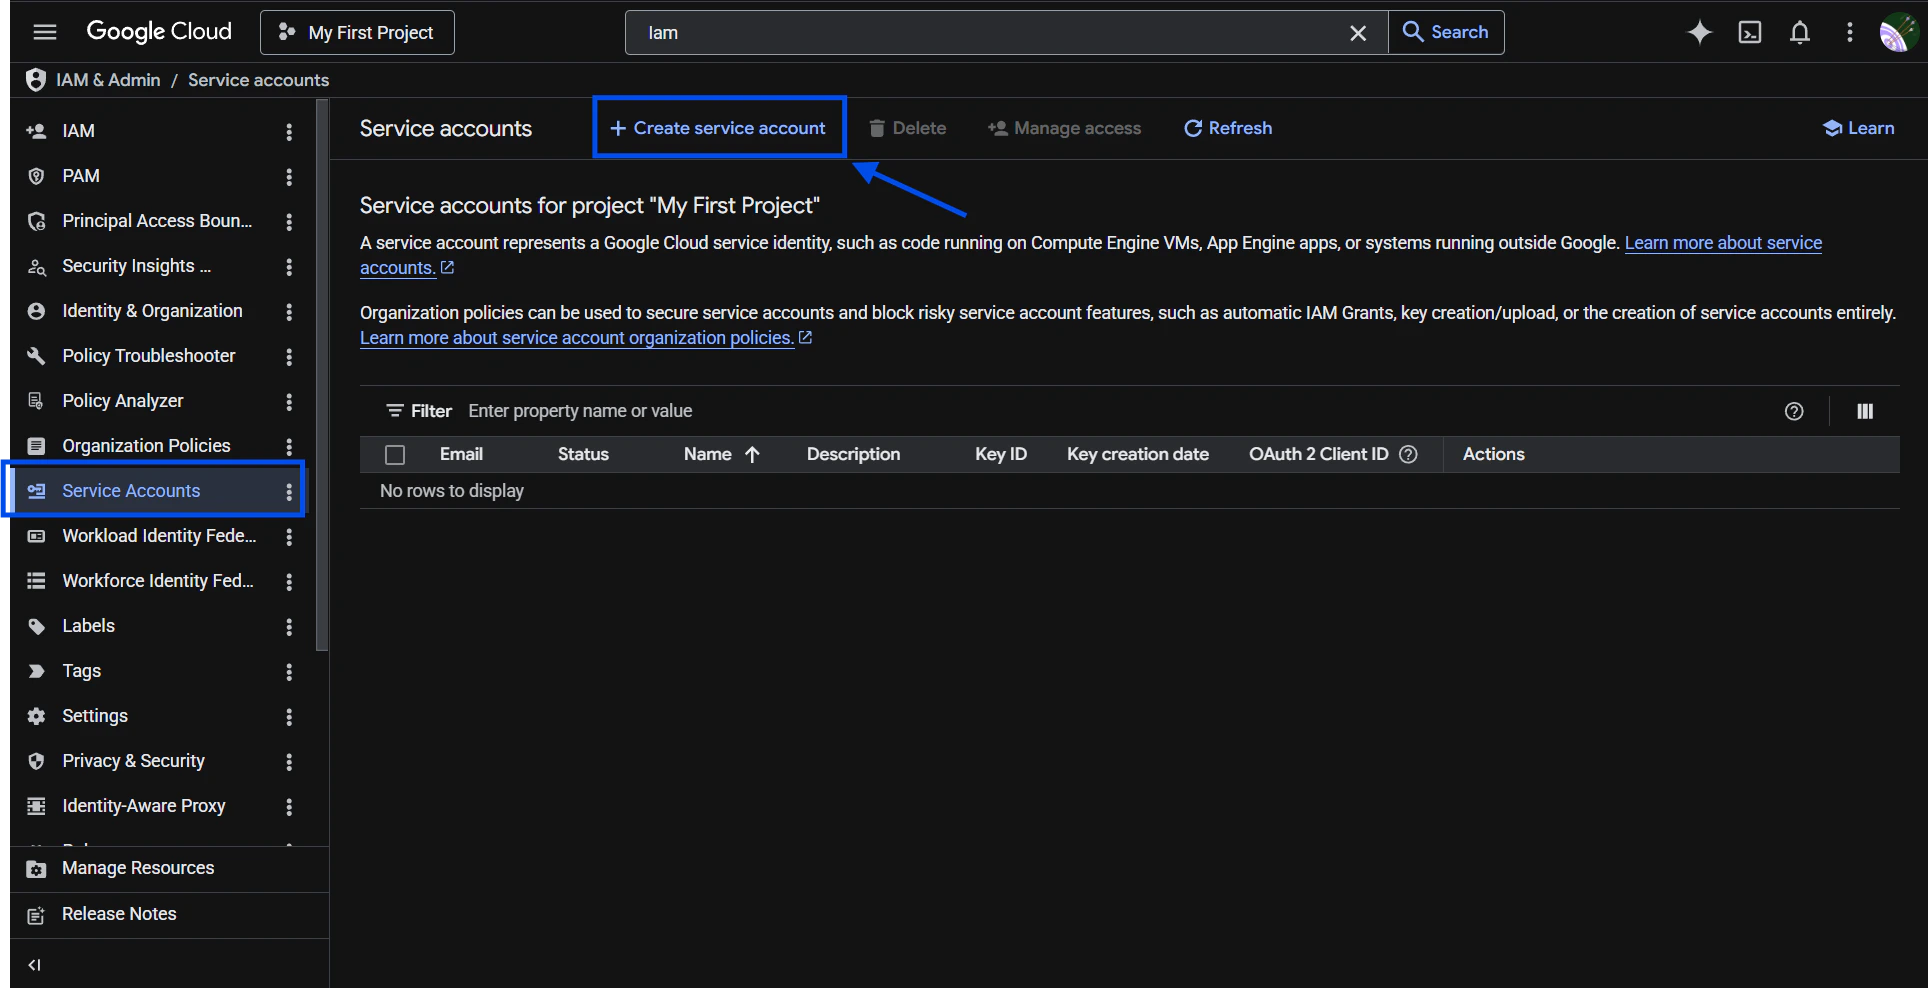
 c. On the left sidebar, click **Service Accounts**, then select **Create Service Account**.
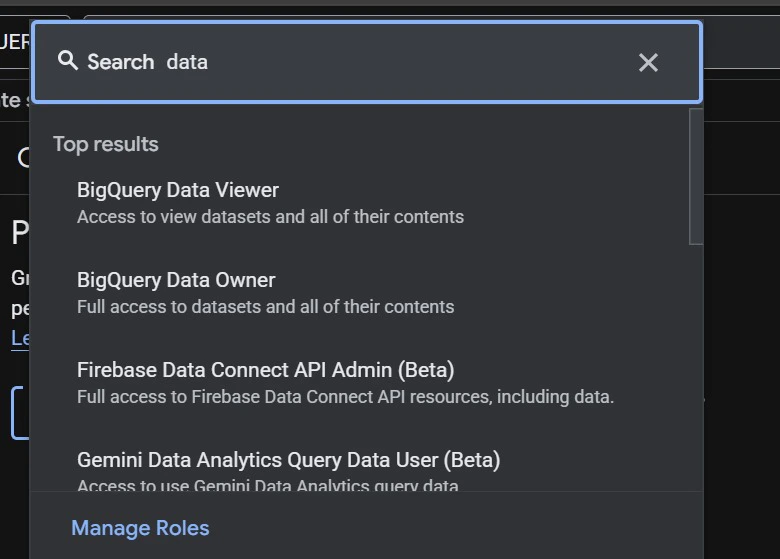
 d. Enter a name and grant the **BigQuery Data Viewer** and **BigQuery Job User** roles.
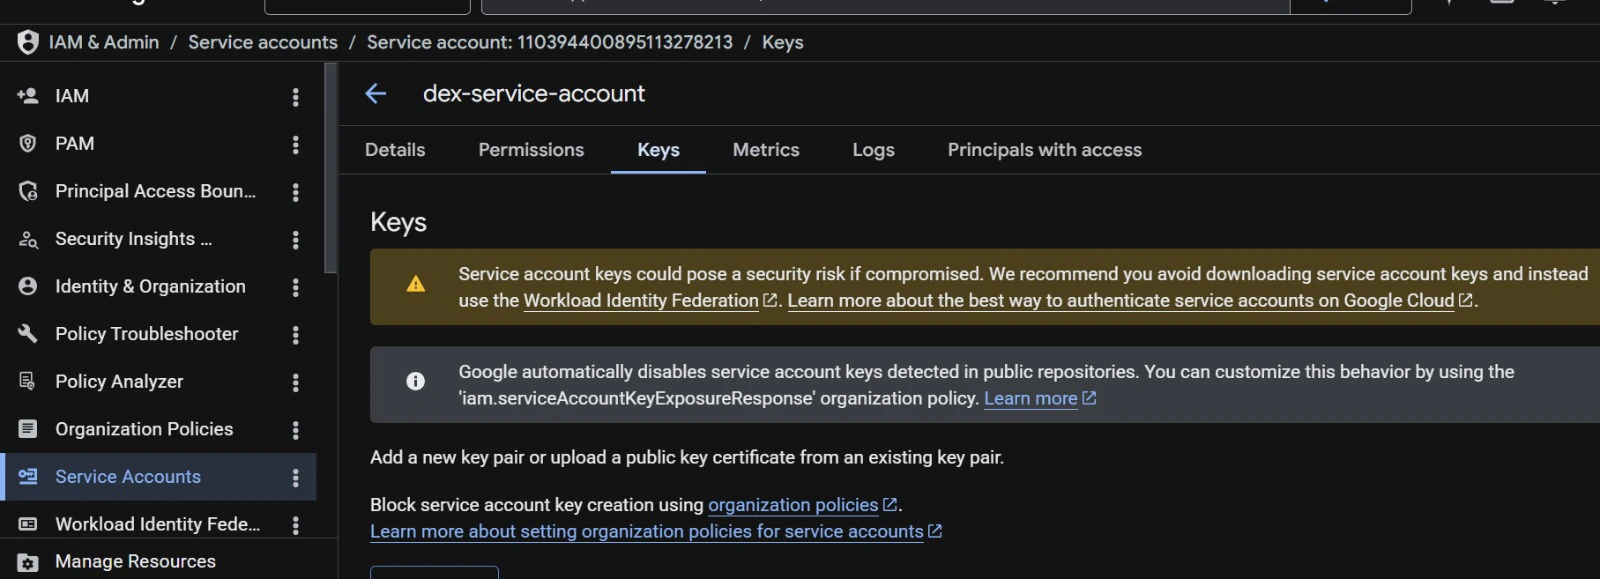
 e. Once created, click the service account ID, open the **Keys** tab, then select **Add key** → **Create new key** → **JSON**.
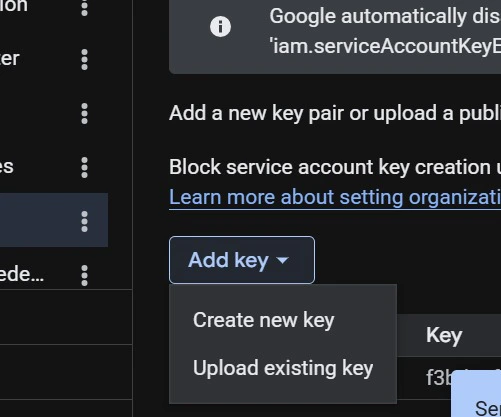
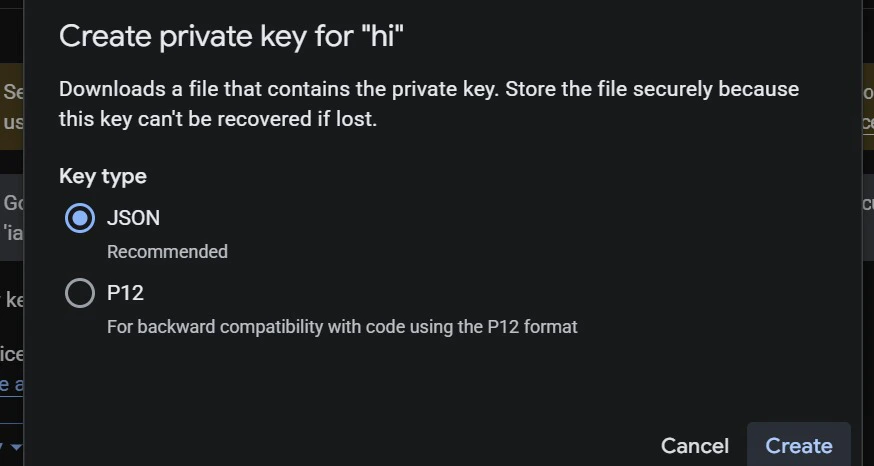 f. The key downloads automatically after you create it.
2. Connections → Add Connection → select `BigQuery`.
3. Enter Project ID and Dataset ID, upload or paste Service Account JSON.
4. Click `Test Connection` then `Connect`.
Notes: Ensure the service account has the required IAM roles.
### Databricks
Required fields: Server Hostname, HTTP Path, Access Token.
Step-by-step:
1. In Databricks SQL Warehouses, open Connection details to find Server Hostname and HTTP Path.
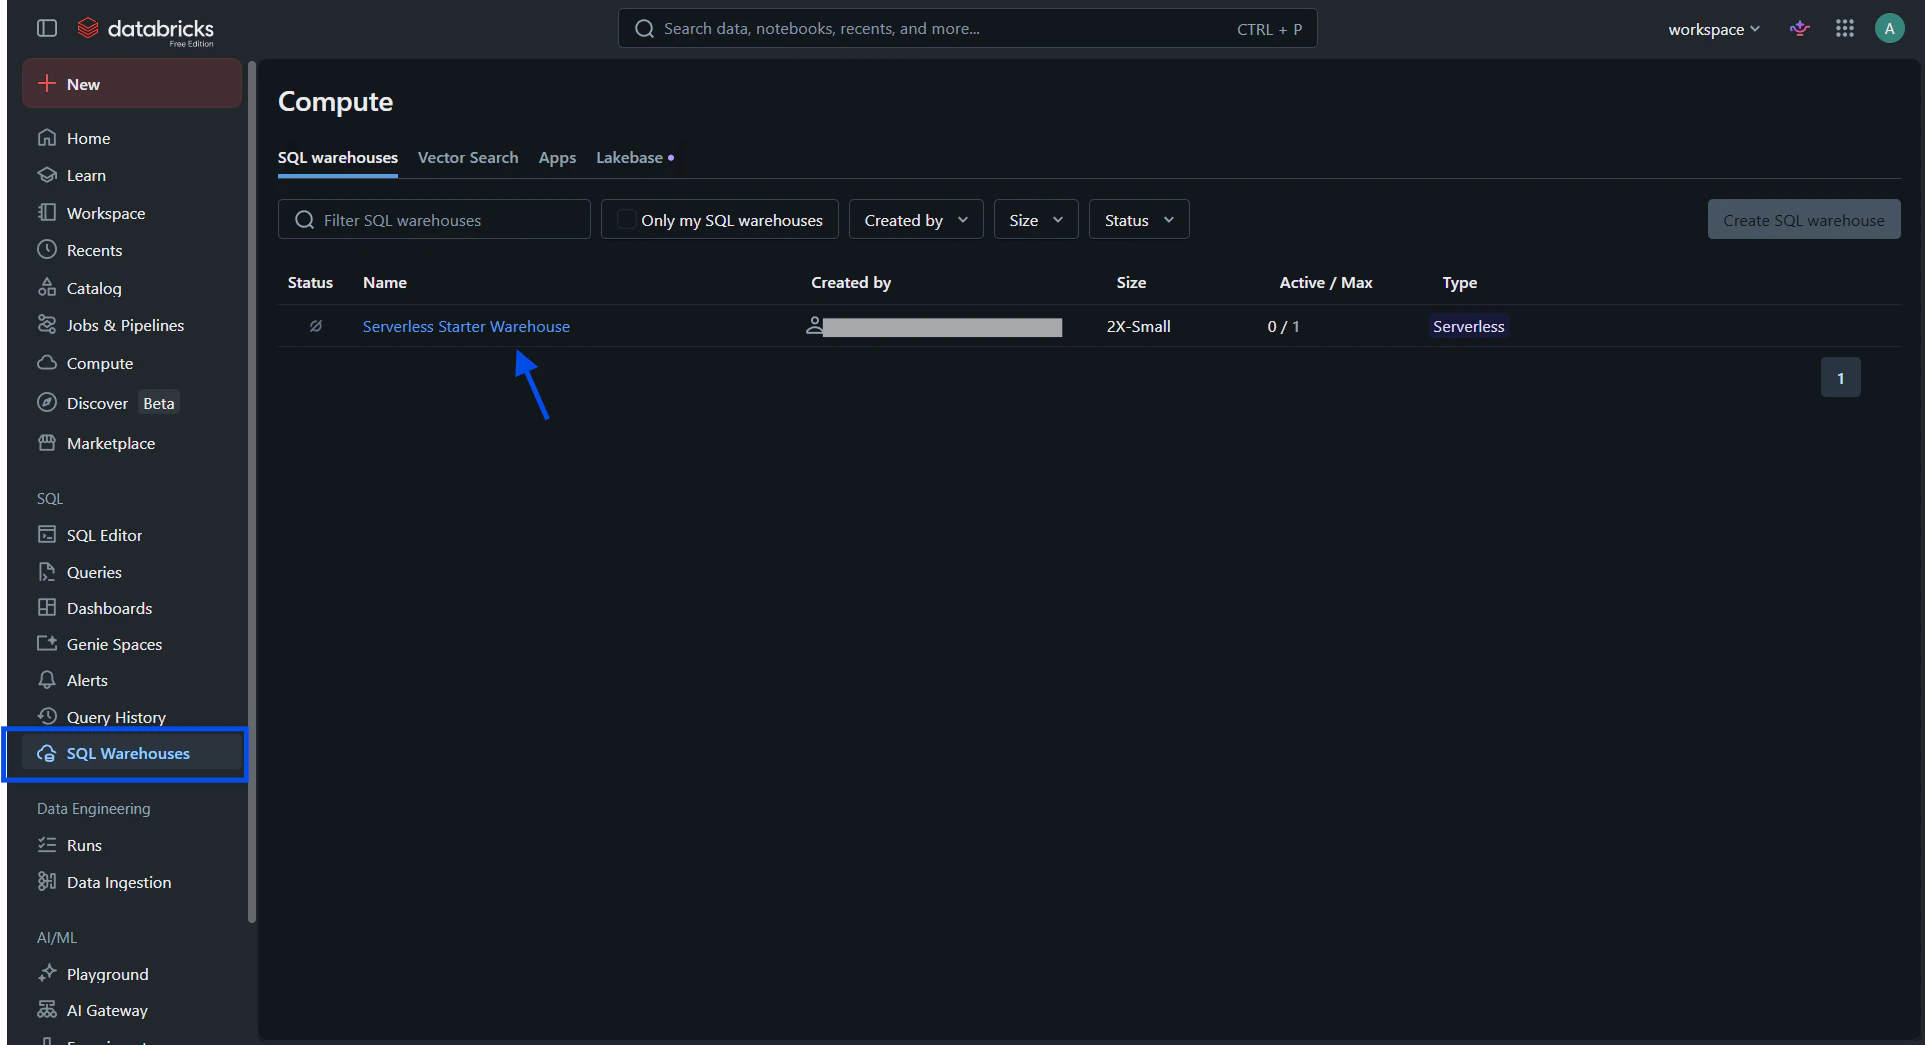
a. Sign in to your Databricks dashboard at [https://www.databricks.com/](https://www.databricks.com/). On the left sidebar select **SQL Warehouses**, then choose the warehouse you want to connect.
f. The key downloads automatically after you create it.
2. Connections → Add Connection → select `BigQuery`.
3. Enter Project ID and Dataset ID, upload or paste Service Account JSON.
4. Click `Test Connection` then `Connect`.
Notes: Ensure the service account has the required IAM roles.
### Databricks
Required fields: Server Hostname, HTTP Path, Access Token.
Step-by-step:
1. In Databricks SQL Warehouses, open Connection details to find Server Hostname and HTTP Path.
a. Sign in to your Databricks dashboard at [https://www.databricks.com/](https://www.databricks.com/). On the left sidebar select **SQL Warehouses**, then choose the warehouse you want to connect.
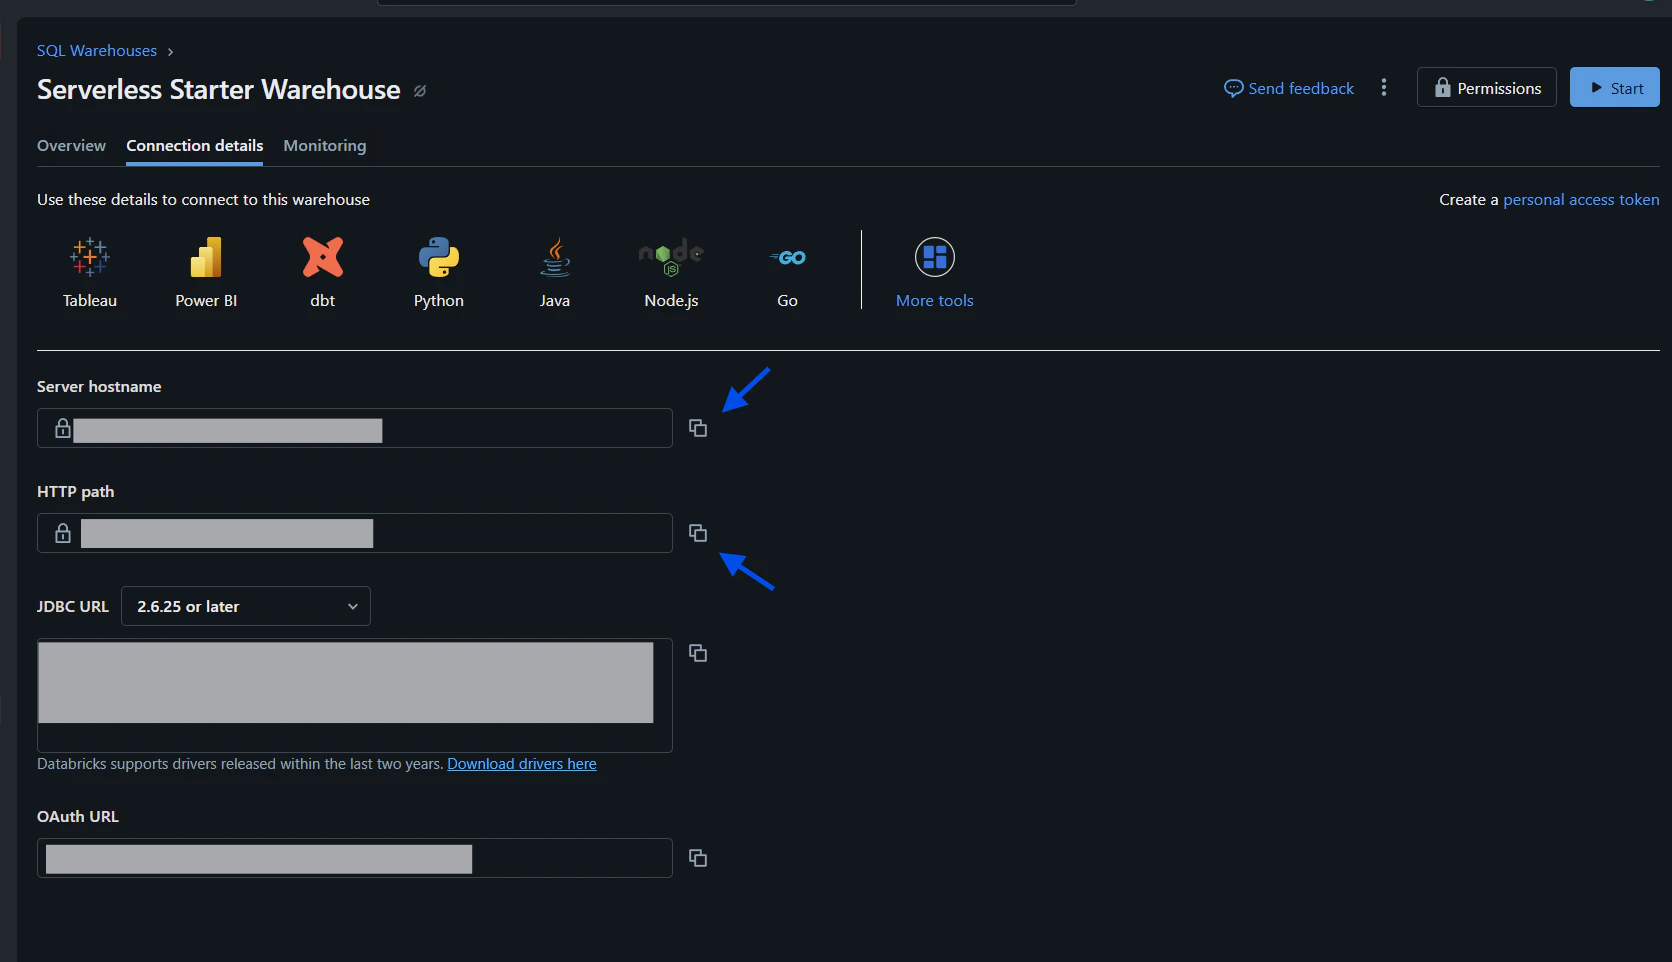
 b. Open **Connection details** for the selected warehouse and copy the **Server Hostname** and **HTTP Path** shown in the dialog.
 2. Generate a Personal Access Token in Databricks user settings and copy it into the Dex connection form.
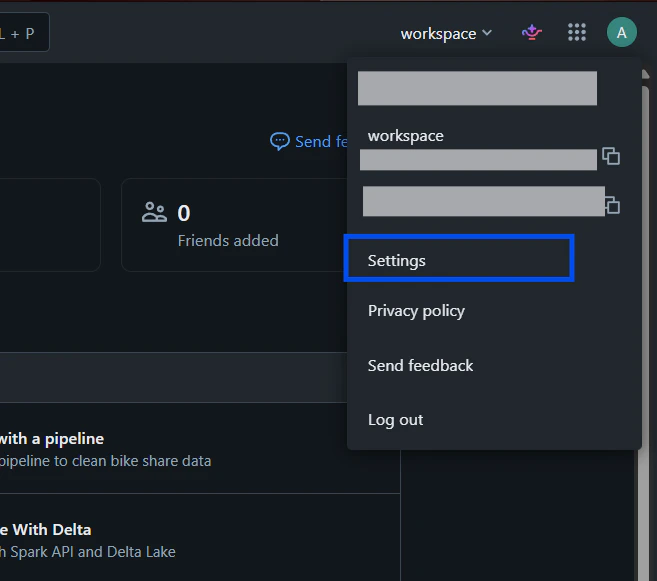
a. From the Databricks dashboard, click your user avatar in the top-right and choose **User Settings**.
2. Generate a Personal Access Token in Databricks user settings and copy it into the Dex connection form.
a. From the Databricks dashboard, click your user avatar in the top-right and choose **User Settings**.
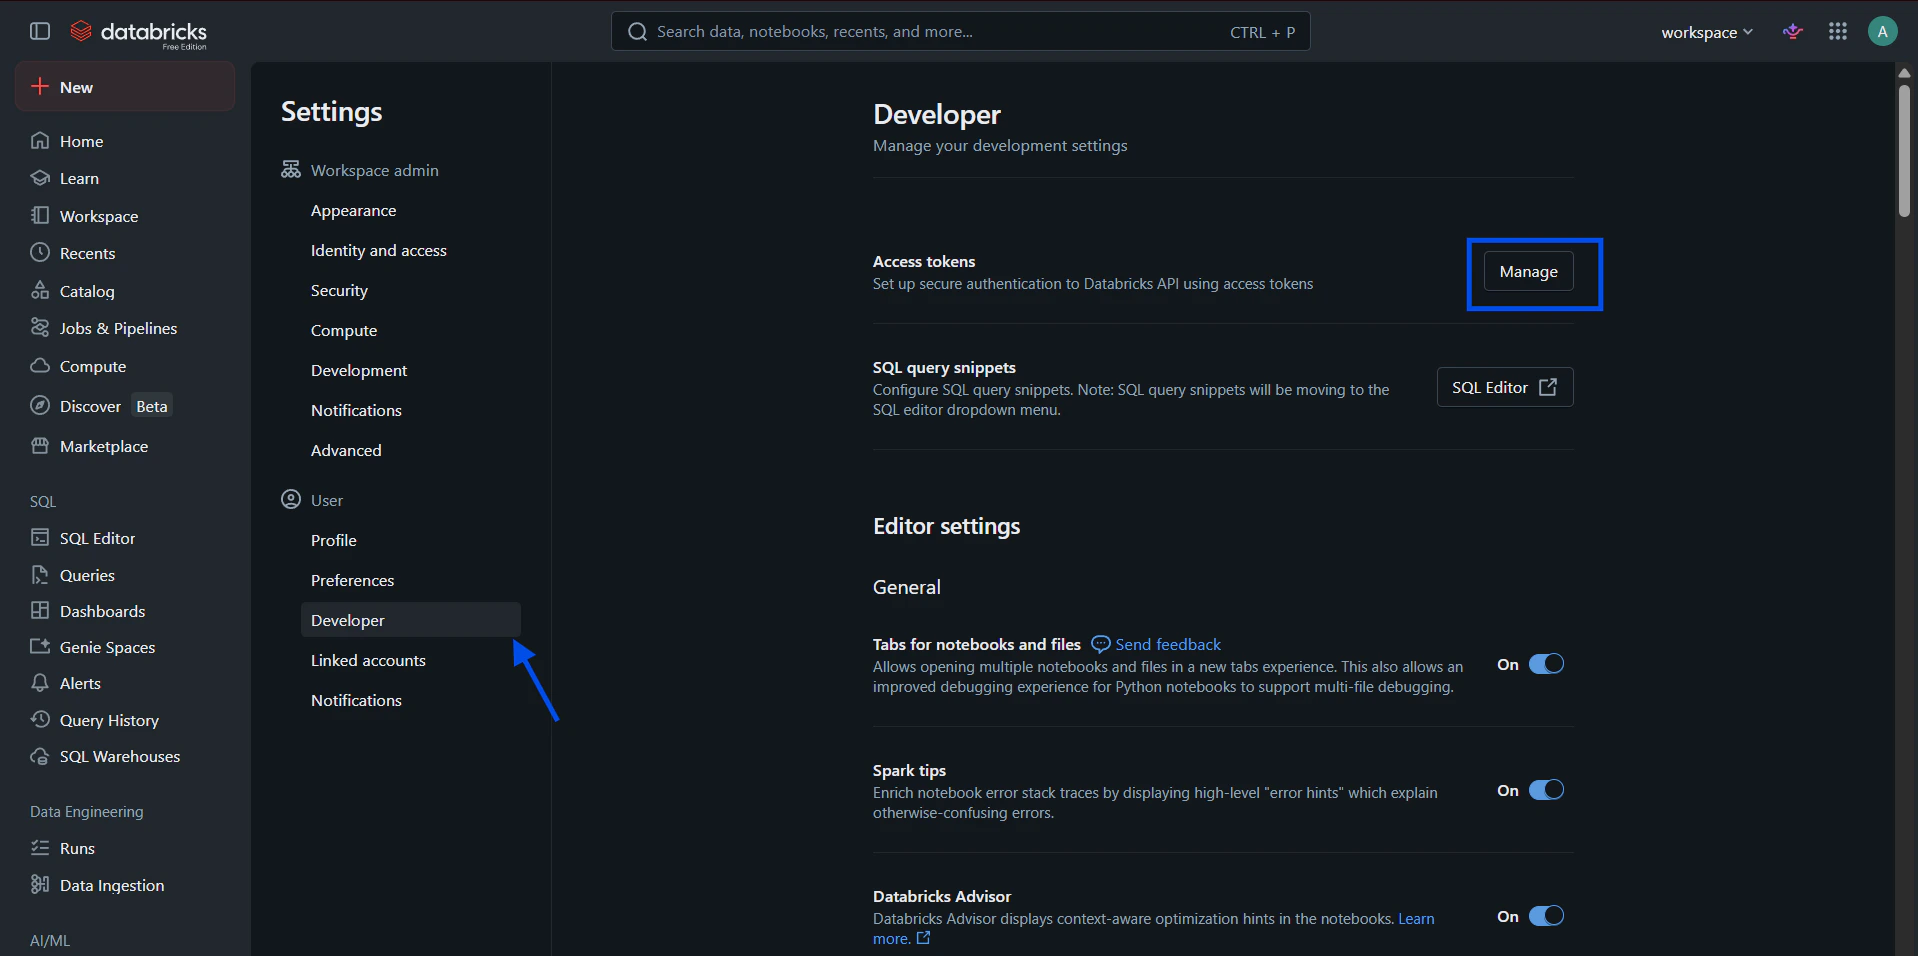
 b. On the Settings page select **Developer** → **Access tokens**, then click the **Manage** button.
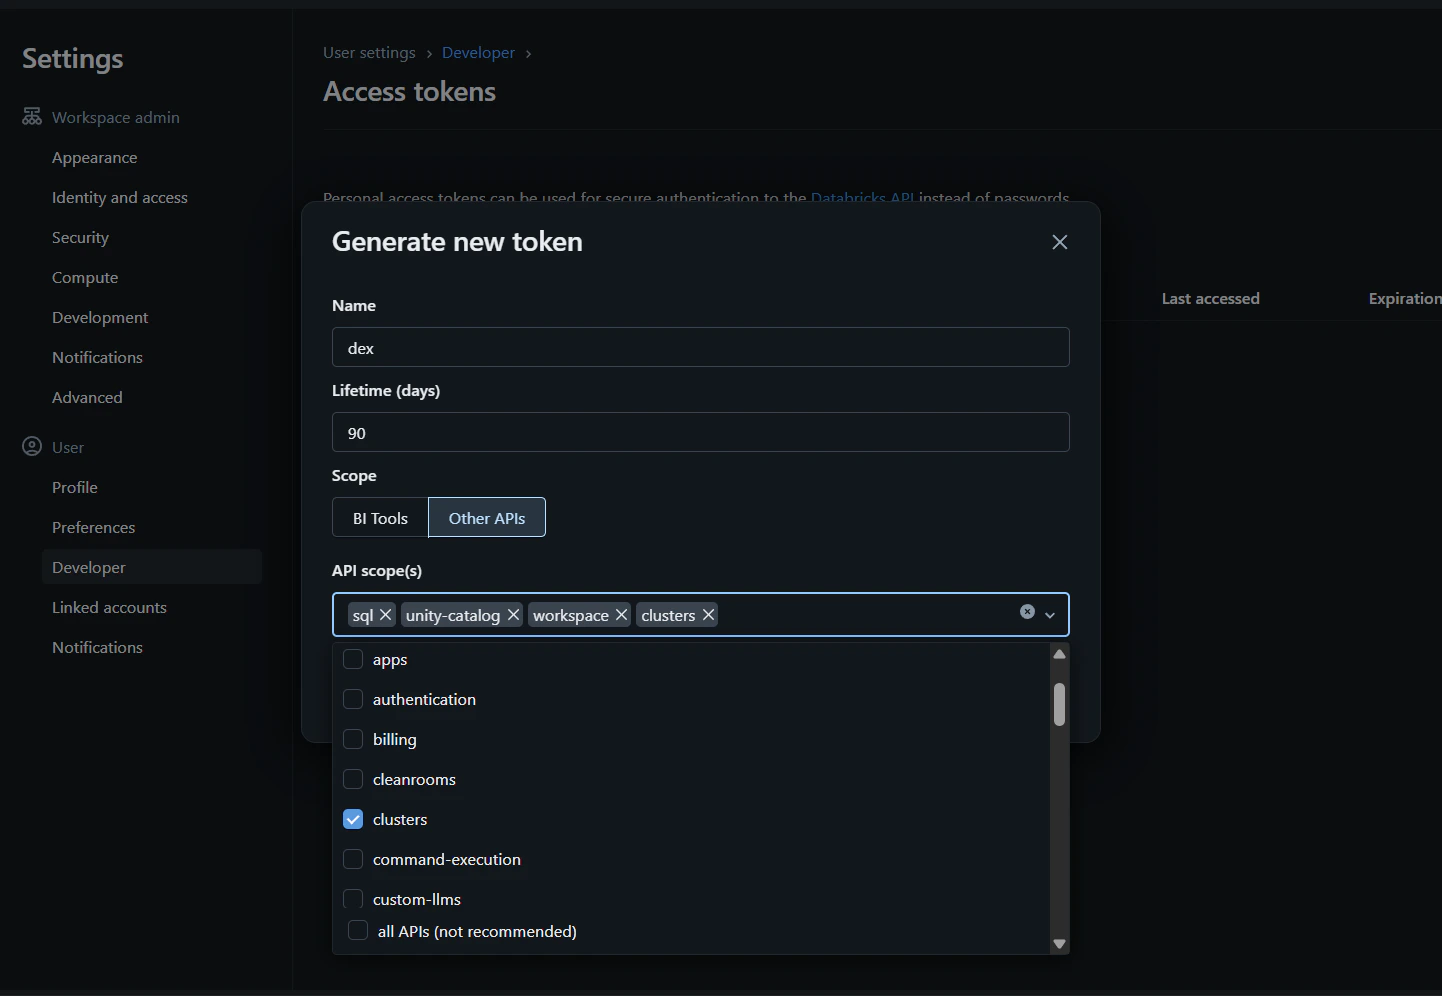
 c. Click **Generate new token**, give the token a descriptive name, set the lifetime, and under **Scope** choose **Other APIs** and select the scopes: **clusters**, **workspace**, **unity-catalog**, and **sql**. Submit to create the token.
 d. Copy the generated token and paste it into the Dex Databricks connection form when prompted.
3. Connections → Add Connection → select `Databricks` and provide Server Hostname, HTTP Path, and Access Token.
4. Click `Test Connection`, choose Catalog/Schema, then `Connect`.
Notes: Dex uses Unity Catalog naming (catalog.schema.table).
### Amazon Redshift
Required fields: Host (cluster endpoint), Port (default 5439), User, Password, Database.
Step-by-step:
1. Sign in to AWS Console and locate your Redshift cluster details.
a. Sign in to the AWS Console at [https://signin.aws.amazon.com](https://signin.aws.amazon.com) and search for **Redshift** in the services bar.
d. Copy the generated token and paste it into the Dex Databricks connection form when prompted.
3. Connections → Add Connection → select `Databricks` and provide Server Hostname, HTTP Path, and Access Token.
4. Click `Test Connection`, choose Catalog/Schema, then `Connect`.
Notes: Dex uses Unity Catalog naming (catalog.schema.table).
### Amazon Redshift
Required fields: Host (cluster endpoint), Port (default 5439), User, Password, Database.
Step-by-step:
1. Sign in to AWS Console and locate your Redshift cluster details.
a. Sign in to the AWS Console at [https://signin.aws.amazon.com](https://signin.aws.amazon.com) and search for **Redshift** in the services bar.
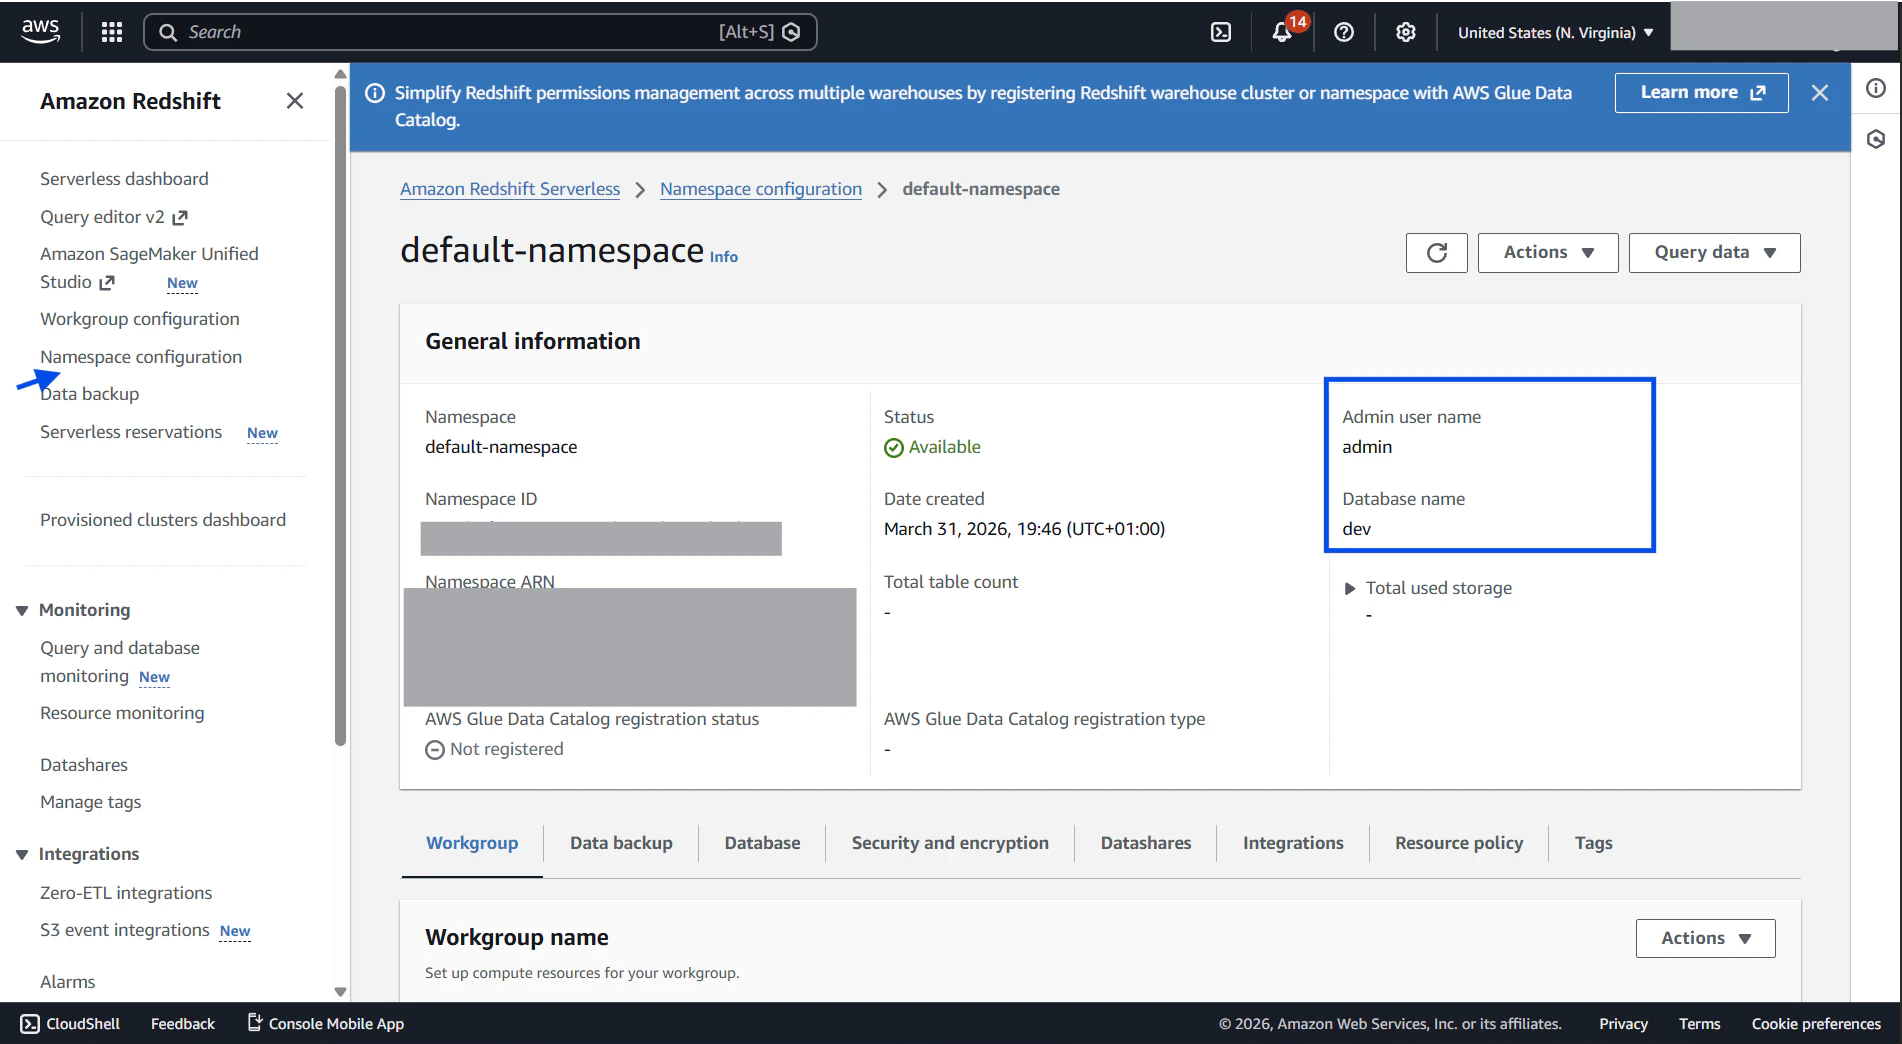
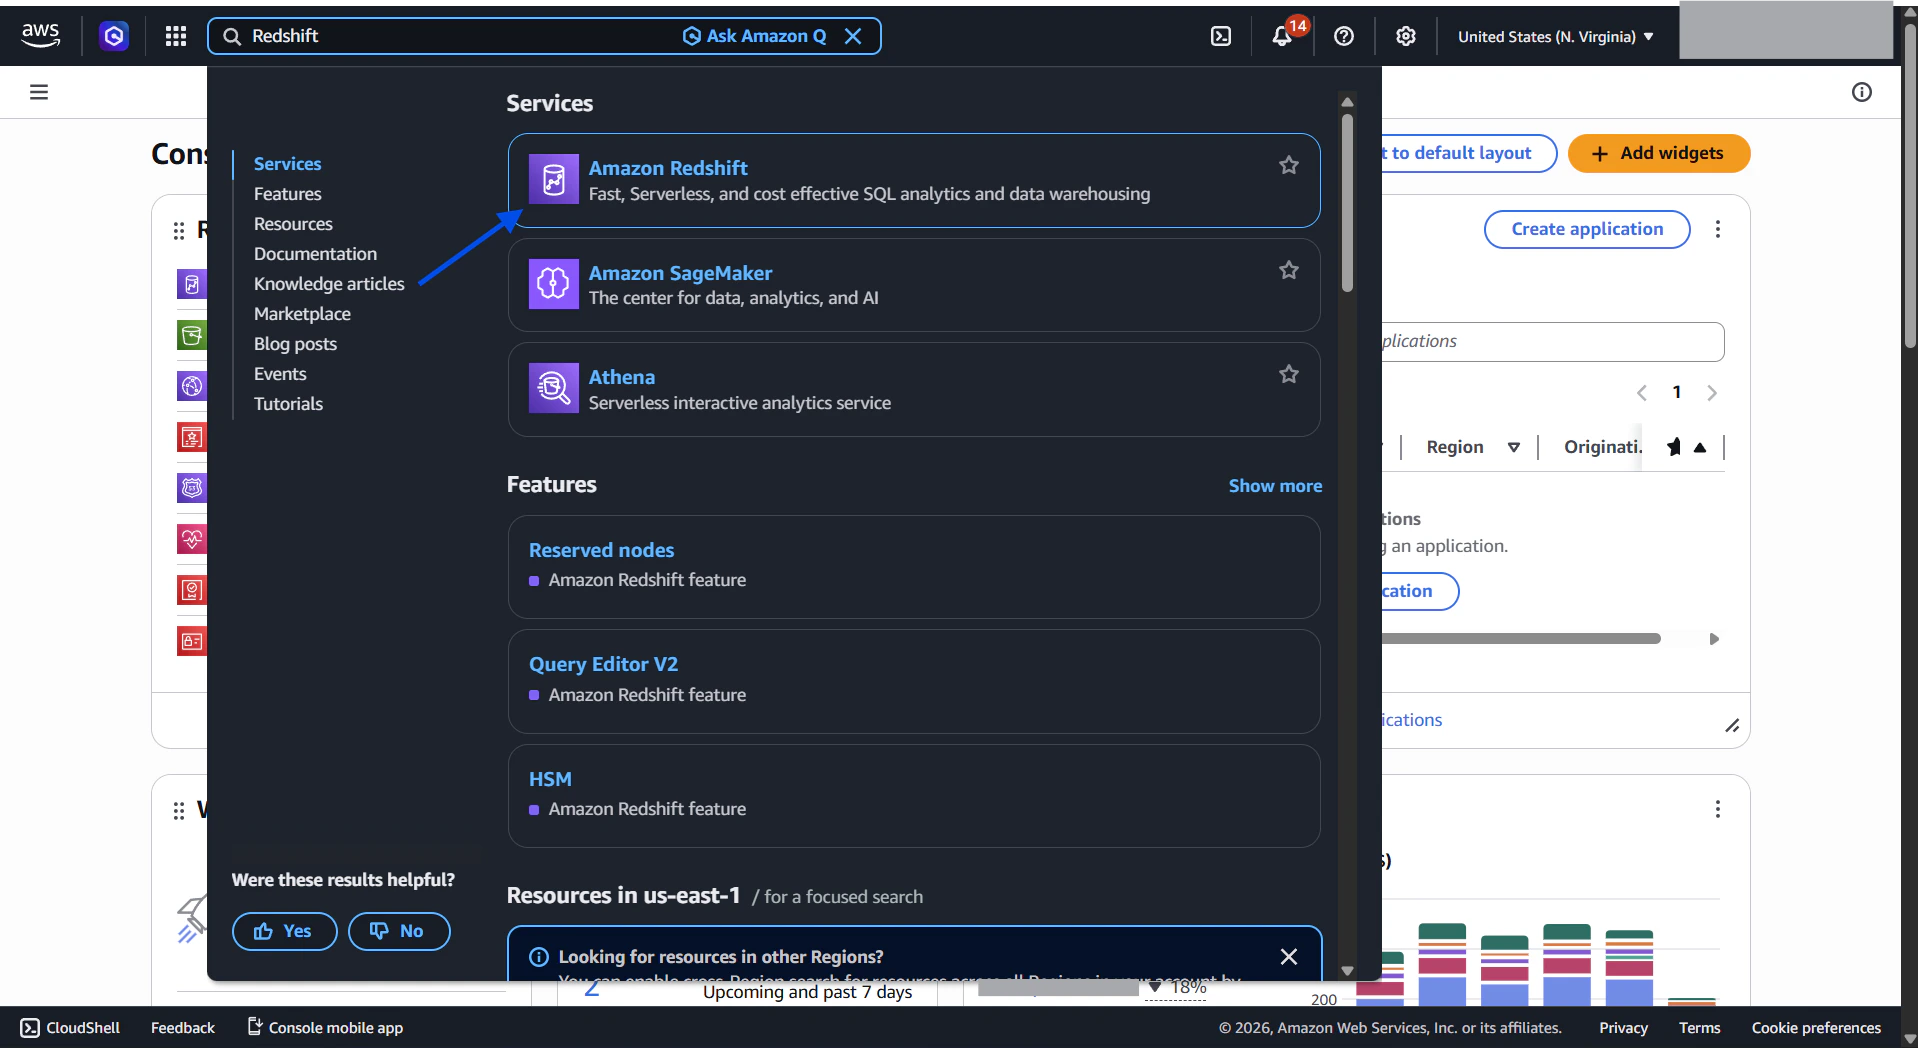 b. From the left sidebar, select **Namespace configuration**, click the namespace you want to connect and find the **Database name** and **Username**.
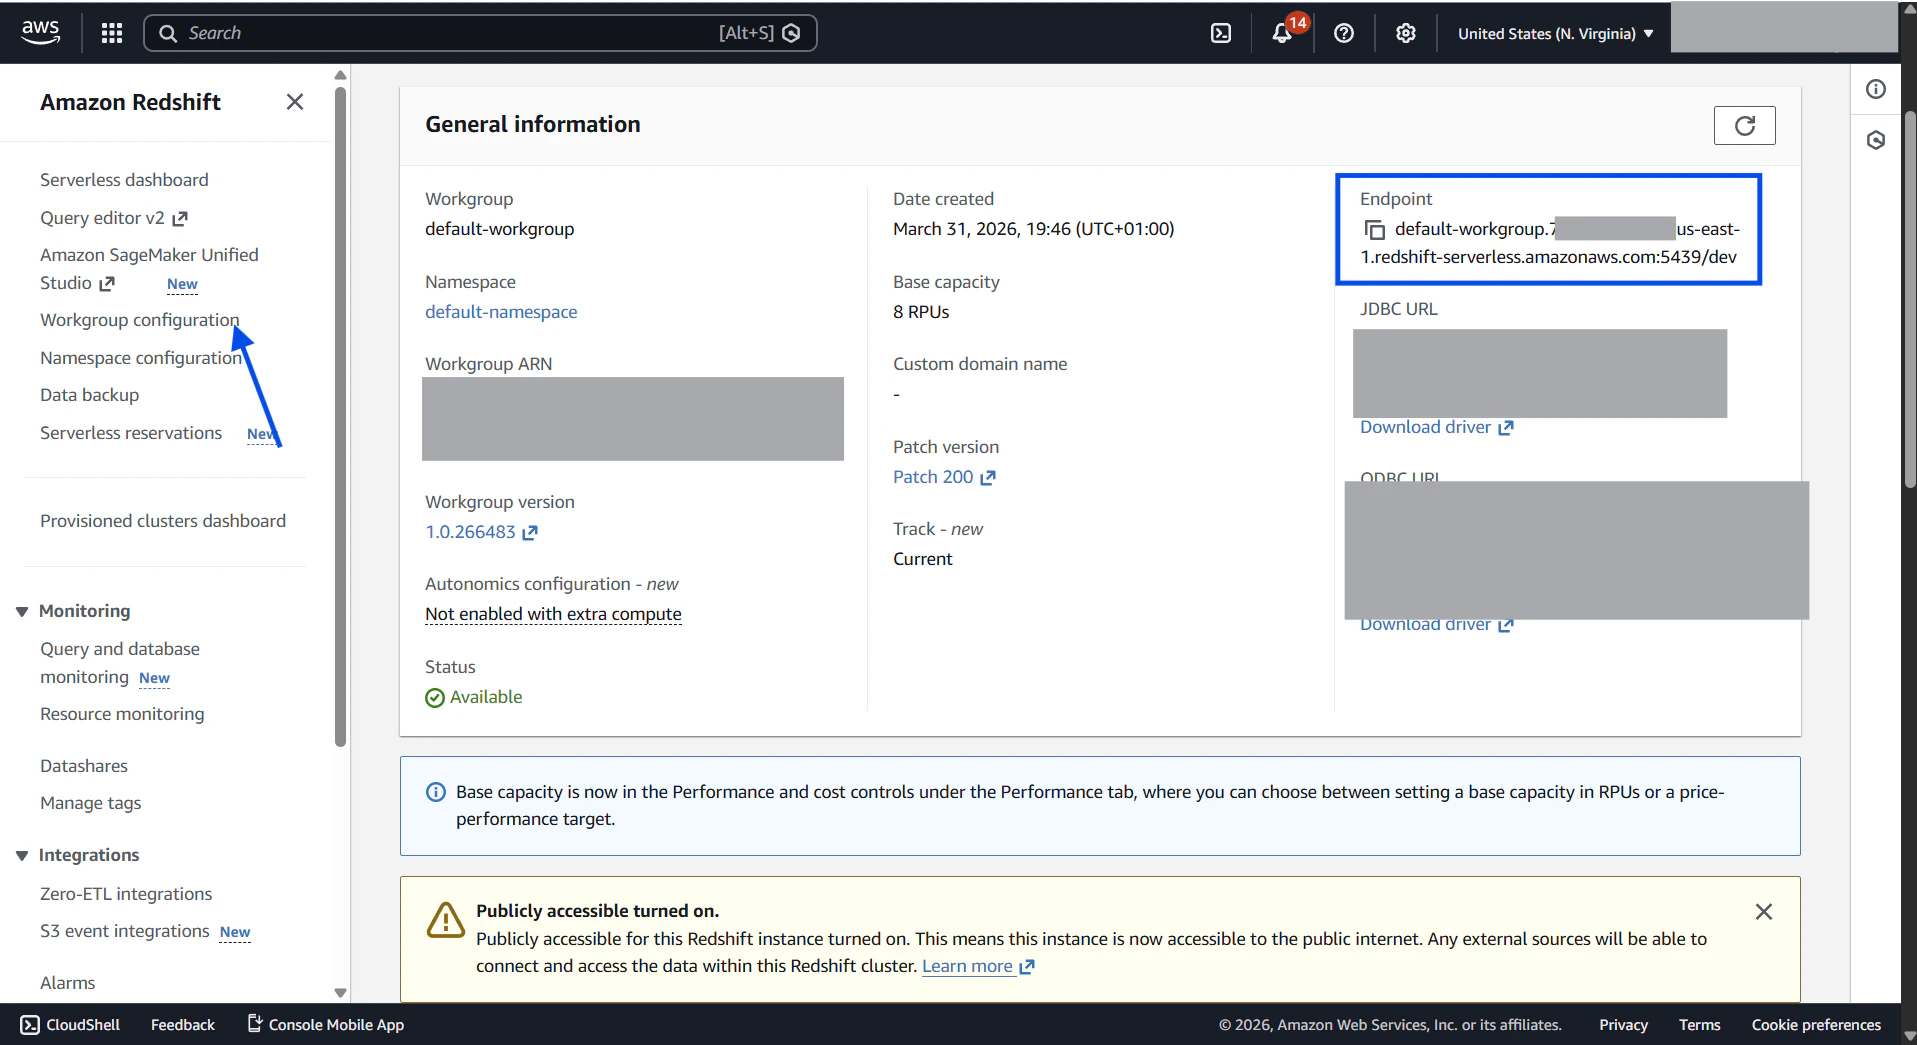
 c. From the left sidebar, select **Workgroup configuration**, then choose the workgroup attached to your namespace and copy the **Endpoint**.
 d. If you do not have the password to access the namespace, contact the admin in charge of your AWS organization or account.
2. Connections → Add Connection → select `Redshift`.
3. Enter Host (endpoint), Port (default 5439), User, Password, and Database.
4. Click `Test Connection` then `Connect`.
Notes: Configure VPC Security Group to allow Dex's IP or make the cluster publicly accessible if needed.
## File-based connections
### CSV
Step-by-step:
1. Connections → Add Connection → select `CSV`.
2. Upload CSV (supported encodings: UTF-8, UTF-8 BOM, Latin-1).
3. Dex auto-detects headers and types, converts to Parquet for fast querying.
4. Name the connection and click `Connect`.
## Integrations (APIs)
### Stripe
Required fields: Secret API Key (`sk_test_` or `sk_live_`).
Step-by-step:
1. Connections → Add Connection → select `Stripe`.
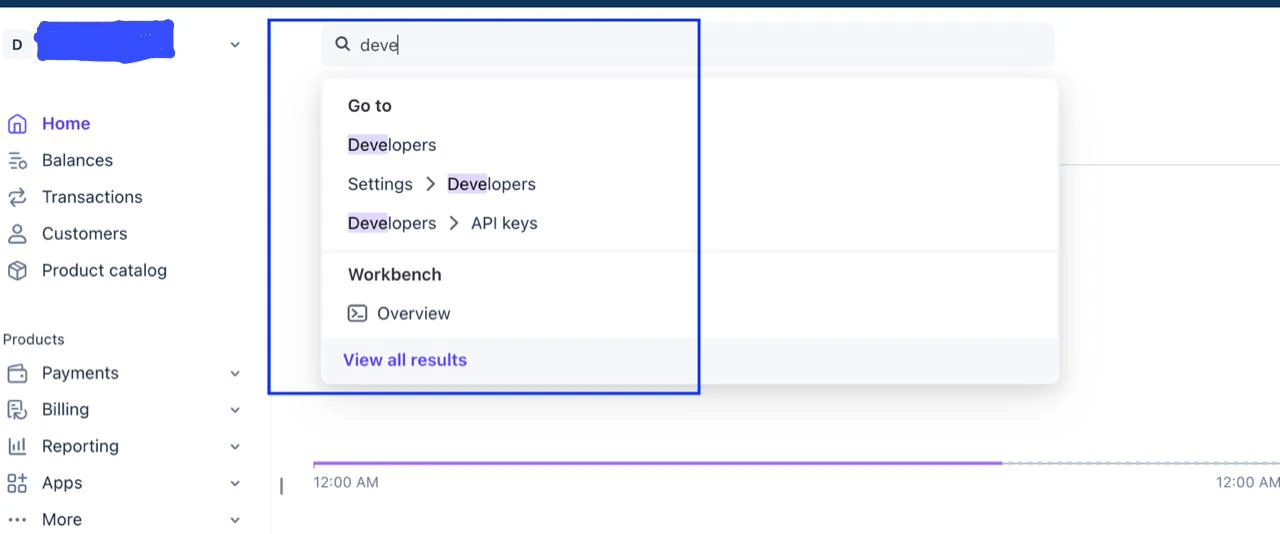
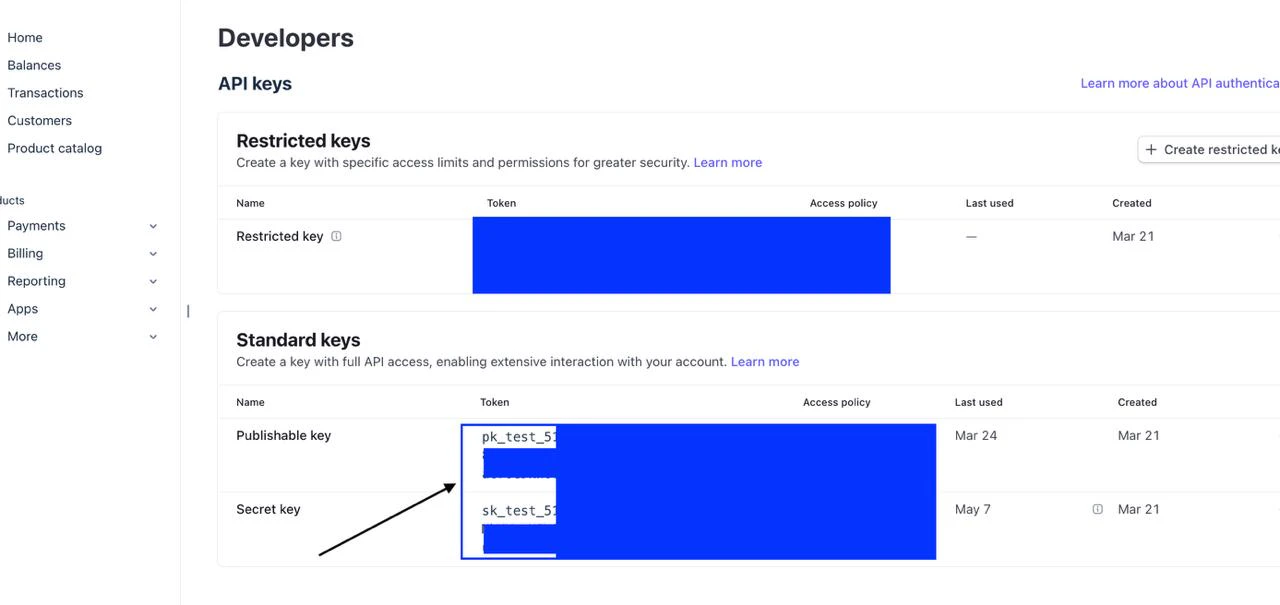
2. Copy Secret API Key from Stripe Dashboard → Developers → API keys.
d. If you do not have the password to access the namespace, contact the admin in charge of your AWS organization or account.
2. Connections → Add Connection → select `Redshift`.
3. Enter Host (endpoint), Port (default 5439), User, Password, and Database.
4. Click `Test Connection` then `Connect`.
Notes: Configure VPC Security Group to allow Dex's IP or make the cluster publicly accessible if needed.
## File-based connections
### CSV
Step-by-step:
1. Connections → Add Connection → select `CSV`.
2. Upload CSV (supported encodings: UTF-8, UTF-8 BOM, Latin-1).
3. Dex auto-detects headers and types, converts to Parquet for fast querying.
4. Name the connection and click `Connect`.
## Integrations (APIs)
### Stripe
Required fields: Secret API Key (`sk_test_` or `sk_live_`).
Step-by-step:
1. Connections → Add Connection → select `Stripe`.
2. Copy Secret API Key from Stripe Dashboard → Developers → API keys.
 3. Paste the key, select enabled resources, click `Test Connection`, then `Connect`.
Notes: Restricted keys (`rk_`) are not supported.
### Shopify
Required fields: Shop Domain (`yourstore.myshopify.com`), Admin API Access Token.
Step-by-step:
1. Connections → Add Connection → select `Shopify`.
2. Create an app in Shopify Admin, enable required Admin API scopes.
3. Install the app and copy the Admin API access token.
4. Enter Shop Domain and Access Token, select resources, `Test Connection`, then `Connect`.
3. Paste the key, select enabled resources, click `Test Connection`, then `Connect`.
Notes: Restricted keys (`rk_`) are not supported.
### Shopify
Required fields: Shop Domain (`yourstore.myshopify.com`), Admin API Access Token.
Step-by-step:
1. Connections → Add Connection → select `Shopify`.
2. Create an app in Shopify Admin, enable required Admin API scopes.
3. Install the app and copy the Admin API access token.
4. Enter Shop Domain and Access Token, select resources, `Test Connection`, then `Connect`.